What to name things?
As I get deeper into the technical stuff around connecting players and redirecting them between servers, i've needed to come to some decisions around terminology. So that I can define some tables and hopefully not have to rename them in the future.
Machine
First up to define is that thing with a CPU and a network adapter that runs Linux. It could be a VM or a physical computer, or even EC2 or a Docker container etc.
I'm thinking machine as the term, is the M in VM. Host is pretty good as well, it leans more network connected but maybe a bit ambiguous about the underlying resources. Where machine feels more specific about a thing with CPU and RAM and disk space. Also in my mind having many machines feels nicer than having many hosts.
Other options:
-
Server: A valid term, the problem is it's generally valid for so many things, so best to avoid adding another meaning to it. I'll try to only use "server" in a "client/server" sense at the code level.
-
Rig: While a silly idea, maybe a little less silly in a game dev context. Tho I think most would think this refers to the end users machine, not the machine in the cloud hosting the game.
-
Box: Too generic I think, and gives the indication that it is a real physical box somewhere, which is a little different from a VM.
Process
The running server code. There might be many of these running on a server, they might all be the exact same code or different versions or totally different games or services entirely. They also have multiple threads to split work up.
Process mainly wins by default, as everything else has drawbacks in one way or another. Maybe the only weird thing is a process will have a processId in our database, but also a pid of the running linux process on the machine.
Other options:
-
Server: See this works everywhere so it's a bad idea ;)
-
Task / Job: These feel a bit short lived compared to a long running game server process. Also i'll want to use the term jobs later for managing workloads within GameStrut, so can't use that here.
-
Daemon / Service: These are not short lived like tasks or jobs so that's good, but they have the sense that there will just be one, and it starts with the machine. Whereas we'll be dynamically starting and stopping services as we deploy or scale, and we might be running multiple of the same thing.
-
Instance: This one is pretty good, but I think this will be confused later on with some online game terminology, like dungeon instances, so best to keep that free.
So now i'm free to start creating tables, or more factually, i'm free to rename the server table to machine and cleanup all the references...
AeroCEO Net Bridge
While AeroCEO is primarily a single player game, I wanted to support multiplayer. It is more difficult to add multiplayer later in development, so I've been making sure it's integrated well from (almost) the start.
The first thing to do was chaning the game rules slightly to be asyncronous turn based. Instead of rotating through players taking one turn at a time, all turns happen in parallel, which makes the game run faster. In the end this does not change too much, but some things like multiple players bidding for a limited number of slots will have to resolve differently.
The second part to make multiplayer easier is that the game is always running a multiplayer game. So when running in single player, the game will still internally run a server that the client will connect to. I had thought about using a real loopback network connection for this, but that might not work on all platforms. Ie: Can you open a listen socket on Switch or iOS? And it would also be slightly slower having to throw all actions across a socket.
The alternative is what i've called a "bridge", basically it's a pretend socket. When playing in offline single player or online multiplayer, the players client will do all of its communication over the bridge. In true offline single player, the bridge will instantly pass data to the internal server via a function call. In multiplayer, the bridge will pass the data over the internet via GameStrut to be processed on a remote server.
To be a multilpayer game, we need ways to keep everyones game and the server in sync. We do that with two parts, serializable game state, and actions. Both of these can be packed or unpacked into blobs, which are a basic building block of GameStrut, like little virtual files that we can read and write to.
The game state includes the world, airports, companies, routes etc. So for AeroCEO, when a player joins a game, the server can pack the whole world stae into the blob and send it to the joining client, that can unpack it and have their game state match whatever is on the server.
Actions then make changes to this data, eg: purchsing planes, bidding on slots and creating routes. When a player makes an action, the client applies it locally, then sends the action to the server to be applied there and forwwaded to all the other players so everyone is up to date.
There is one little complication to that tho, we want to keep players actions secret from each other till the end of turn.
So for this the server will actually hold all queued actions and only finally applying and sending to others at the end of the turn.
Also, when sending the game state to a player, we only send their queued actions, not everyones. A neat feature of keeping the queued actions and applying at the end of turn, is that it's trivial to add undo functionality, we just drop the last queued action for a player.
C# On Linux ARM

Here's my MNT Reform. It's a laptop with a mechanical keyboard, and while it is physically robust, it's not a high performance monster. So while the performance is adequate, it cannot handle all the bloat of modern software.
I hope to turn this little laptop into a distraction free environment to do a lot of my development of GameStrut. It's still in the very early stages, but I know at the very least it will involve C# to support Unity3d. So I've been experimenting on how to build and debug C# on Linux ARM.
Runtimes
The two ways of running compiled code that I've looked into is dotnet and mono.
.NET Core aka dotnet is a successor to the original .NET Framework. It adds cross platform support, that the original was lacking, but also removes some things that were available in the previous incarnation. The things it cuts out are not a big deal for me as I'll be writing everything from scratch anyway, so I have no legacy dependencies or requirements, and my code is usually pretty vanilla so it will run anywhere.
I had some trouble installing dotnet via the Microsoft apt package server on my Reform as it is using Debian 12, and perhaps also because it was ARM. I was able to install easily using the dotnet-install.sh script and manually adding the ~/.dotnet directory to the PATH.
The other option is Mono. It has been around for a long time, initially developed as a open source Linux runtime for the .NET Framework. I'll probably lean towards Mono as I have used it previously for Puzzle Quest 3 and had no problems there. Also it is most similar to what Unity3d uses internally, so it would be good to stay somewhat in sync there as well.
While mono is available in the Debian apt repository, it's a bit old. So it's best to follow the install instructions on mono-project.com to get the latest version.
Building
C# code is usually built based on a project file generated by Visual Studio. It's just a simple XML file and there's enough info on the net if I need to modify or build it from scratch.
The msbuild command works the same was its Windows counterpart, building a project and outputting the results with little fuss. It has lots of options and is reliable, but it is a little slower than I'd like.
csc is the offical Microsoft C# compiler (and probably what msbuild uses internally). It does not know anything about projects, so you must supply all the files to be compiled as command line arguments, similar to something like gcc.
mcs is the Mono version of the C# compiler. As far as I can tell it's basically the same as the official counterpart, but a little faster.
Ive ran a very unscientific speed test on the ways of building a project:
time msbuild
real 0m12.497s

time csc -recurse:\*.cs -out:out.exe
real 0m5.476s

time mcs -recurse:\*.cs -out:out.exe
real 0m2.575s
This was a smallish project, but it did have about 70 tiny source files. Mono mcs is the clear winner here, but it remains to be seen if these differences will matter too much in a large project.
IDEs
While I can use a text editor and build and run with the command line. It would be nice to have a development environment to help.
There's a couple of features I'm specifically looking for:
-
Omnibox - This is a feature in newer IDEs, similar to web browsers where there is a textbox that can accept many different commands. Tho primarily i'm interested in being able to jump to files by name, to be able to quickly move about the project.
-
InteliSense - this is where the IDE scans your project and is able to use that information to make your life better. Things like auto complete for variable and function names, and being able to jump directly to where things are defined.
-
DeDebugging - This is the ability to be able to set breakpoints directly in the IDE and being able to inspect a running app, things like being able to select a variable in the source file and seeing what value it is. This can be a lot easier than setting up a bunch of print statements then running the program to spit them out.
Visual Studio Code
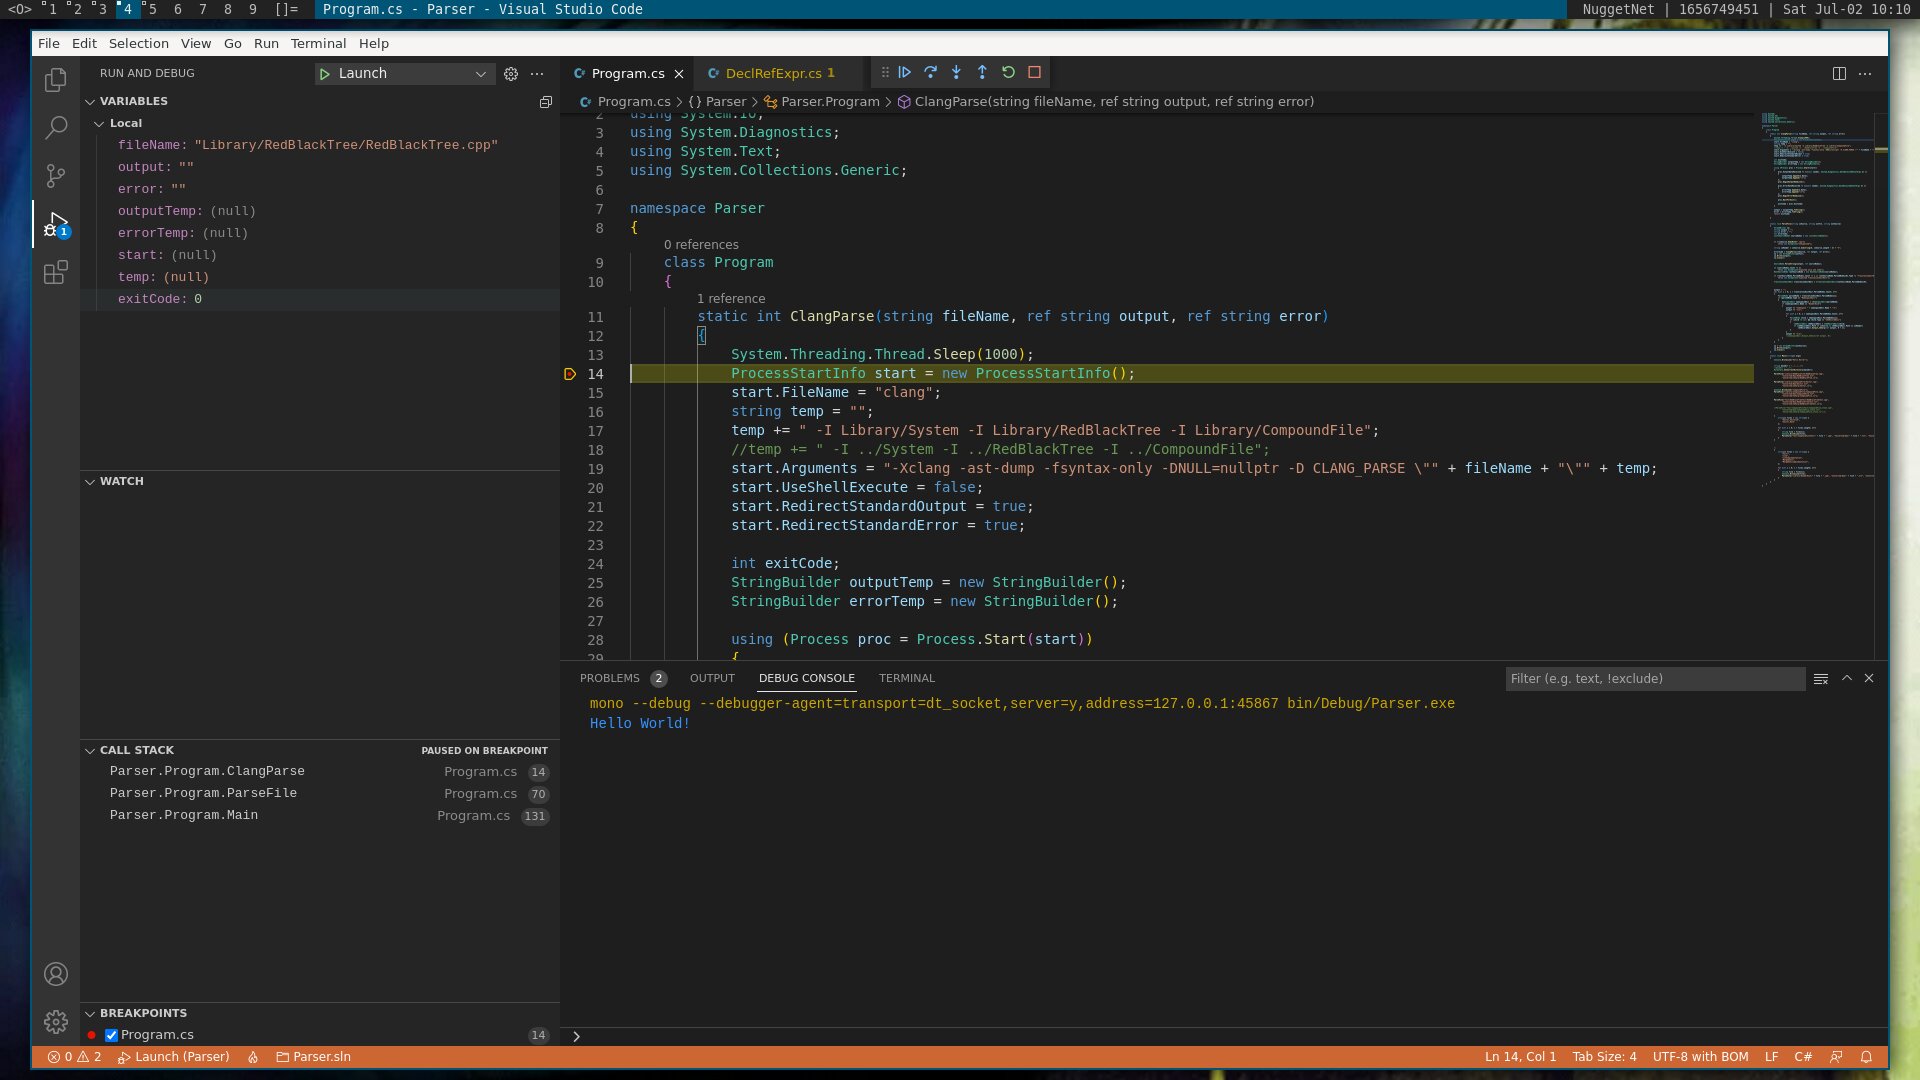
Fully featured, but on the slow side. I think it will unfortunately end up being just too slow to keep using for the long run, especially as the project and VSC itself get bigger over the years and start demanding more resources.
✓ Omnibox
✓ InteliSense
✓ Debugging - Was having trouble with exceptions not being able to retrieve their info, but that's probably a weird config issue that could be fixed if i was committed to using VSC long term.
Monodevelop
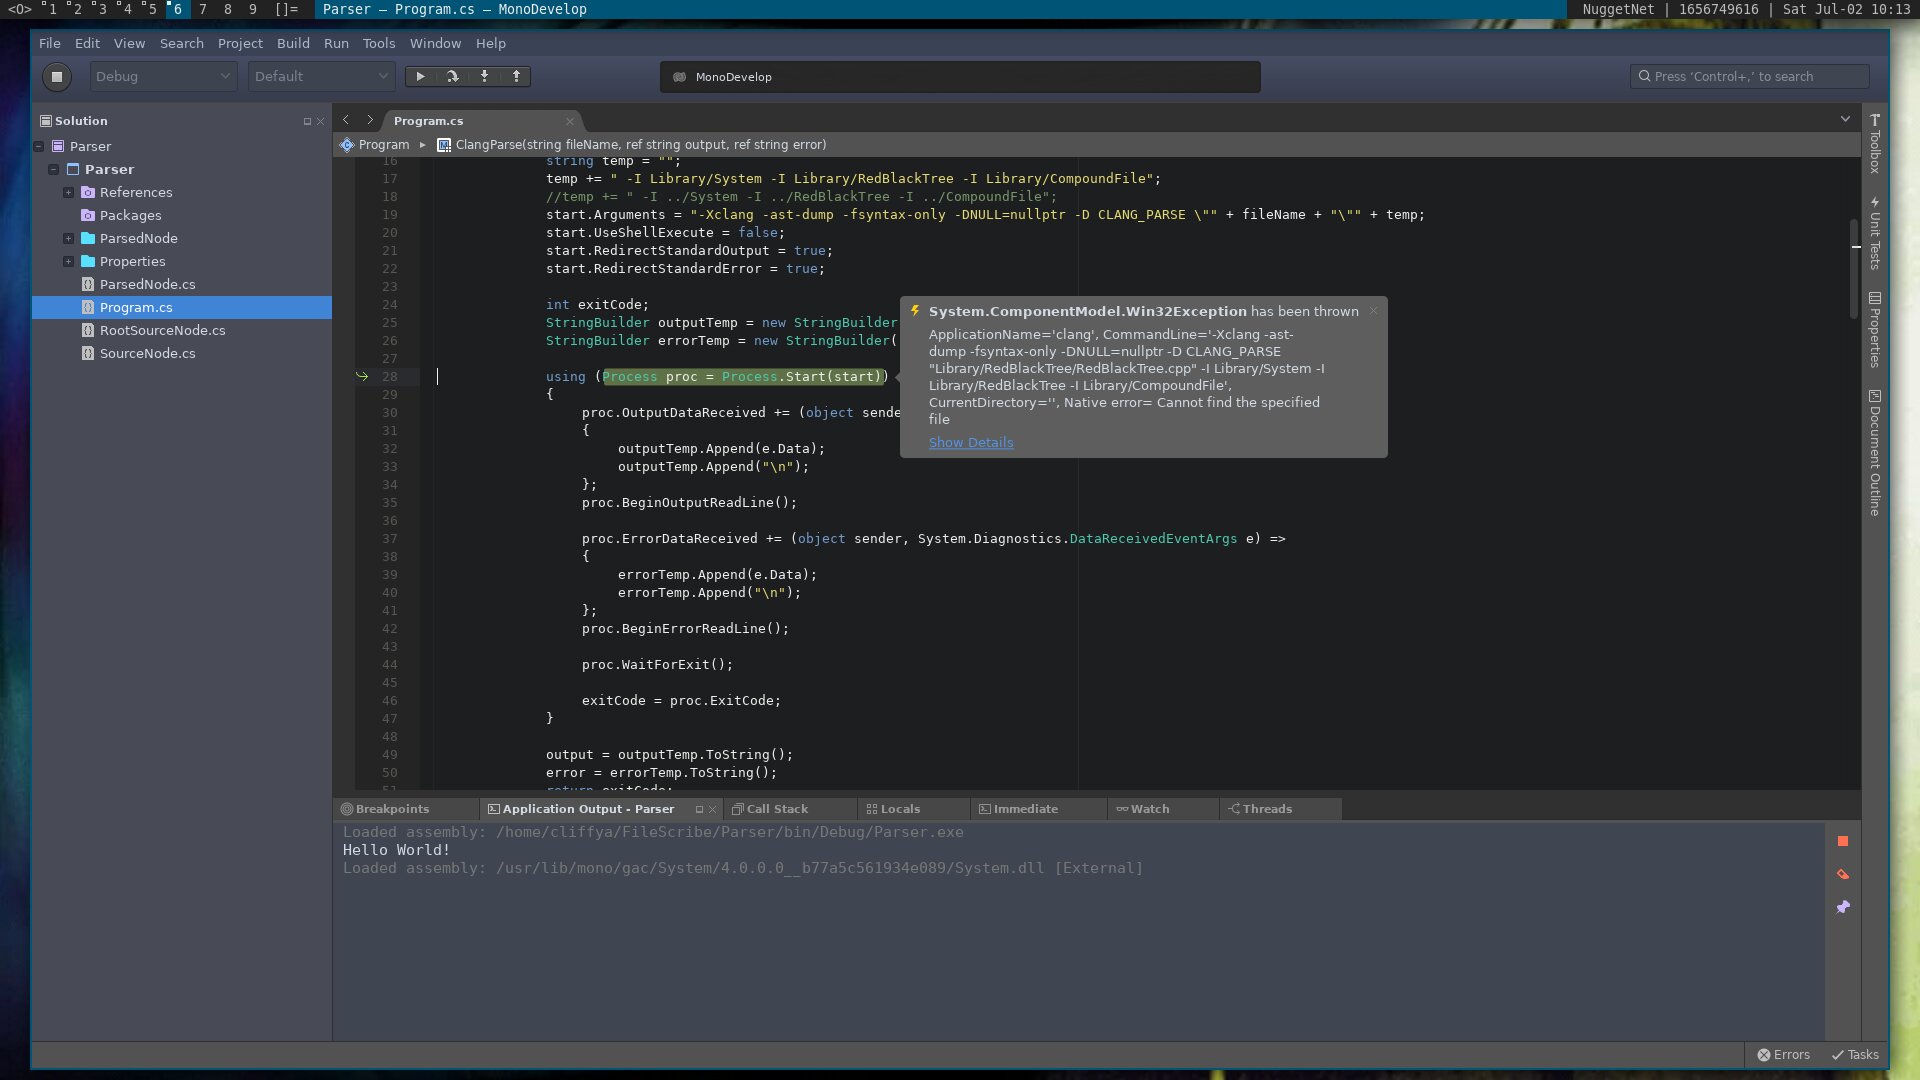
A faster GUI than VS Code, but a teeny bit on the slow side. Thinks like opening a project or starting a build can stall for a little bit. I would probably use this for some deep debugging alongside a different editor.
x Omnibox
✓ InteliSense
✓ Debugging
Sublime Text
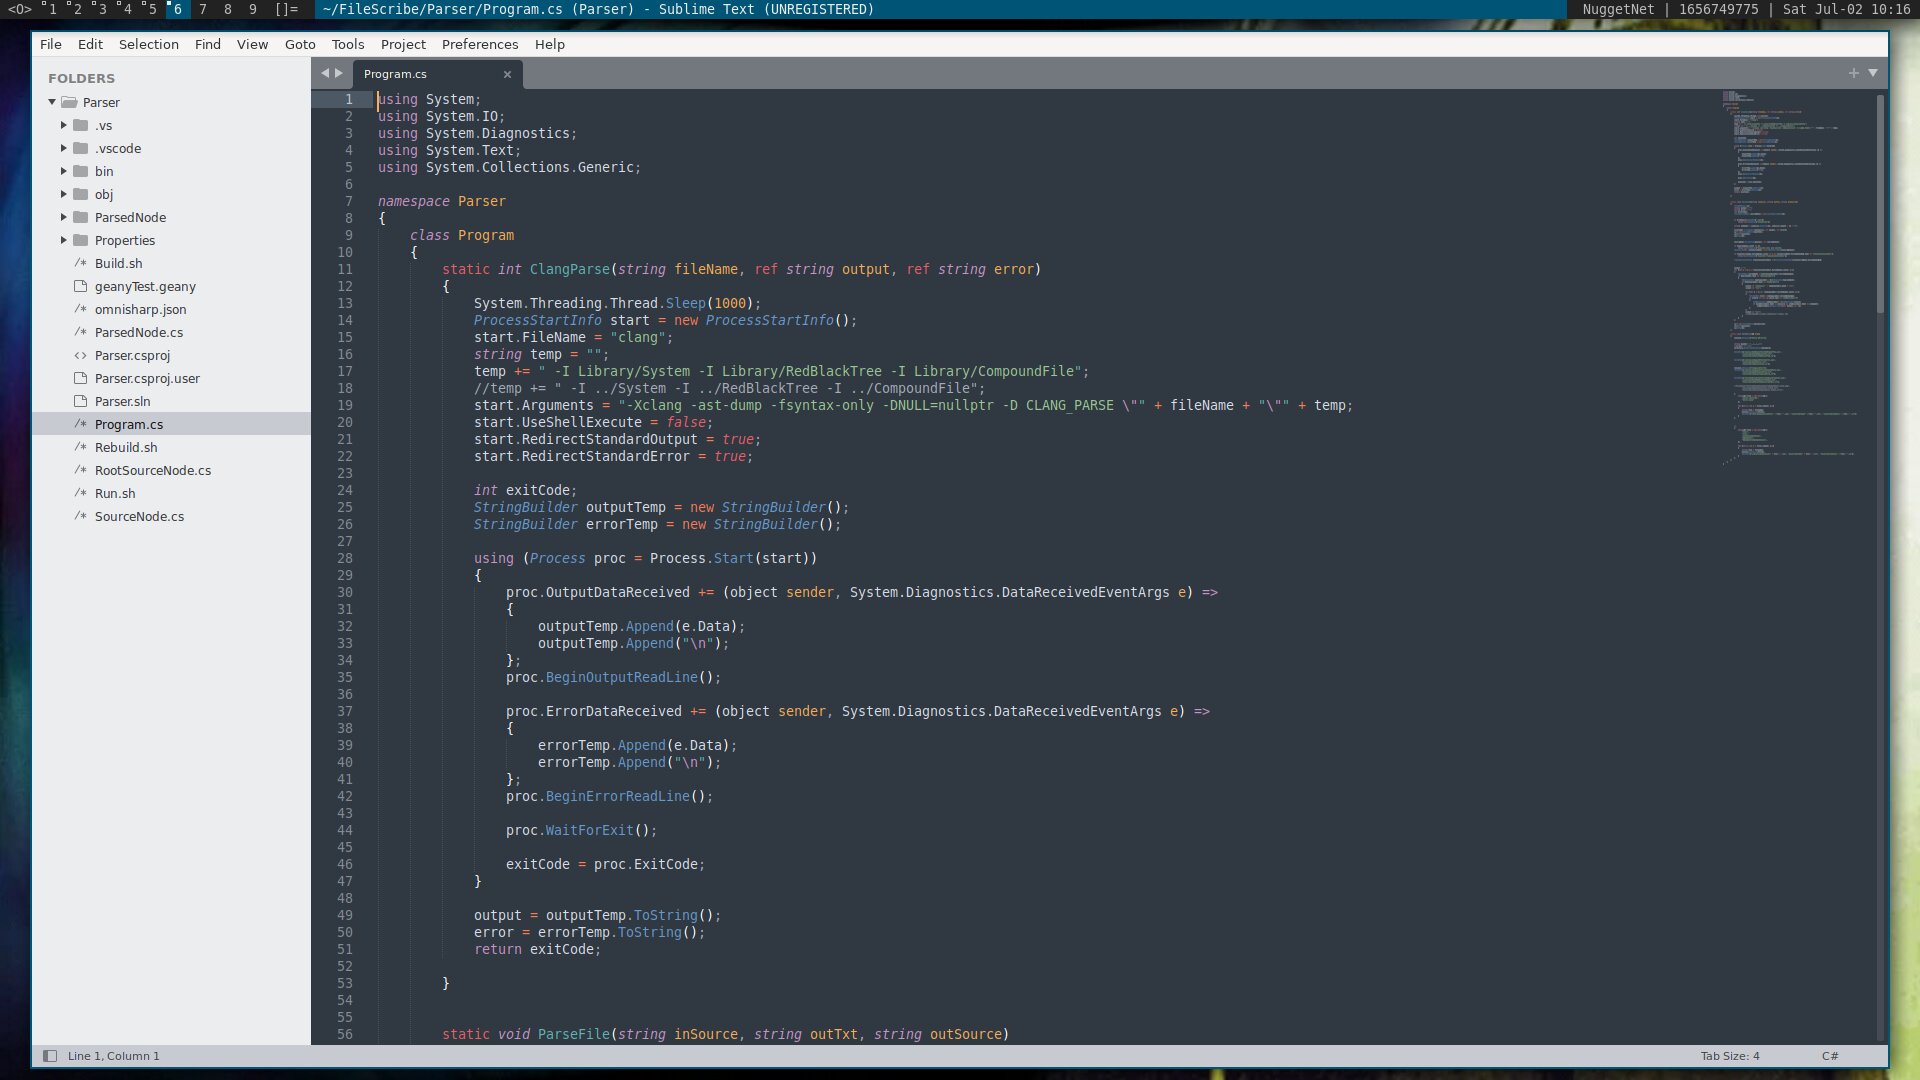
A fast enough GUI, it could be better with things like startup time, but I can live with it. I'm using it right now to write this blog post!
The problem is I was unable to get the C# plugin to actually work :(.
✓ Omnibox
x InteliSense - The Sublime Text 3 plugin for C# is abandoned and no longer working.
x Debugging - Even with the plugin I don't think this was supported.
x Jump to error
Geany

A very speedy editor that unfortunately does not have a lot of C# support.
✓ Omnibox - While it does not have an actual omnibox, Geany does have several plugins to jump to files by name. I choose Quick Open.
x InteliSense - Not available but it does have some typing completion from class names in the project.
x No debug
Vim
I have used vim with omnisharp in the past, but it felt a bit too clunky to me once several disparate packages were added together to create the functionality.
And it felt like a long process of tweaking and learning to vim better was ahead of me...
✓ Omnibox - Jump to file can be added by the "ctrl+p" plugin.
✓ Intelisense - There is plugin support for all the expected OmniSharp functionality
x Debugging - I have not had this setup, I assume it could, but may be a lot of work
Conclusion
At this point I'm not sure which IDE or combinations of IDEs I'll start out with. Definitely towards the faster end. The last worst/best option is for me to write my own IDE with the minimal feature set I want. But that's a very dumb idea. Stay tuned for my next post!